Learning Gem5 (Chinese Version)
简介
这是本教程的简介,它说了很多有趣的事情。
本文档的目的是向读者提供有关如何使用gem5和gem5代码库的全面介绍。本文档的目的不是提供gem5中每个功能的详细描述。阅读完本文档后,您应该在教室和计算机体系结构研究中使用gem5感到很自在。另外,您应该能够修改和扩展gem5,然后将其改进贡献到主要的gem5存储库中。
这份文件的背景是我在威斯康星大学麦迪逊分校(University of Wisconsin-Madison)读研究生时在过去六年中对gem5的亲身经历。所提供的示例只是做到这一点的一种方法。 与Python不同,Python的口头禅是“应该有一种-最好只有一种-明显的方式来做到这一点。” (来自Python的Zen。请参见import this),在gem5中,有多种不同的方法可以完成同一件事。因此,本书提供的许多示例都是我认为最好的处理方式的观点。
我学到的重要一课(困难的方法)是,在使用诸如gem5之类的复杂工具时,在使用它之前实际了解其工作原理非常重要。
Todo
完成上一段,这是了解如何实际使用工具的一个好主意。
Todo
应该添加一个术语列表。 诸如“模拟系统”与“主机系统”之类的东西。
您可以在github上找到这本书的源代码: https://github.com/powerjg/learning_gem5
第一部分:gem5入门
构建gem5
本章详细介绍如何设置gem5开发环境和构建gem5。
Todo
添加一个指向gem5 docker镜像的指针。 实际上,我们可能希望每个部分都有一个docker映像。
gem5的环境要求
有关更多详细信息,请参见gem5要求。
在Ubuntu上,您可以使用以下命令安装所有必需的依赖项。 要求详细说明如下。
sudo apt install build-essential git m4 scons zlib1g zlib1g-dev libprotobuf-dev protobuf-compiler libprotoc-dev libgoogle-perftools-dev python-dev python
- git(Git)
gem5项目使用Git进行版本控制。 Git是一个分布式版本控制系统。 通过链接可以找到有关Git的更多信息。 默认情况下,应在大多数平台上安装Git。 但是,要在Ubuntu中安装Git,请使用:sudo apt-get install git
- gcc 4.8+
您可能需要使用环境变量来指向gcc的非默认版本。
在Ubuntu上,您可以使用以下命令安装开发环境:sudo apt-get install build-essential
- SCons
gem5使用SCons作为其构建环境。SCons就像在快速建筑上制造一样,并且在构建过程的所有方面都使用Python脚本,这是一个非常灵活(但很慢)的构建系统。
要在Ubuntu上使用SCons:sudo apt-get install scons
- Python 2.7+
gem5依赖于Python开发库。 要在Ubuntu上安装它们,请使用:sudo apt-get install python-dev
- protobuf 2.1+
“protocol buffers是一种与语言无关,与平台无关的可扩展机制,用于序列化结构化数据。” 在gem5中,protobuf库用于跟踪生成和回放。 protobuf不是必需的软件包,除非您计划将其用于跟踪生成和回放。sudo apt-get install libprotobuf-dev python-protobuf protobuf-compiler libgoogle-perftools-dev
获取代码
将目录更改为要下载gem5源的位置。 然后,要克隆存储库,请使用git clone命令。
现在,您可以将目录更改为包含所有gem5代码的gem5。
你的第一次构建gem5
让我们开始构建一个基本的x86系统。当前,您必须为要模拟的每个ISA分别编译gem5。此外,如果使用Ruby简介,则每个缓存一致性协议都必须具有单独的编译。
要构建gem5,我们将使用SCons。SCons使用SConstruct文件(gem5/SConstruct)设置许多变量,然后在每个子目录中使用SConscript文件查找和编译所有gem5源。
第一次执行时,SCons会自动创建gem5/build目录。在此目录中,您会找到由SCons,编译器等生成的文件。用于编译gem5的每组选项(ISA和缓存一致性协议)将有一个单独的目录。
build_opts目录中有许多默认编译选项。这些文件指定最初构建gem5时传递给SCons的参数。我们将使用X86默认值,并指定我们要编译所有CPU模型。您可以查看文件build_opts/X86来查看Scons选项的默认值。您也可以在命令行上指定这些选项以覆盖任何默认值。
scons build/X86/gem5.opt -j9
传递给SCons的主要参数是您要构建的内容 —— build/X86/gem5.opt。在这种情况下,我们将构建gem5.opt(带有调试符号的优化二进制文件)。 我们要在目录build/X86中构建gem5。由于该目录当前不存在,SCons将在build_opts中查找X86的默认参数。(注意:我在这里使用-j9在我的计算机上的8个内核中的9个内核上执行构建。您应该为计算机选择一个合适的编号,通常为cores + 1。)
输出应如下所示:
Checking for C header file Python.h… yes
Checking for C library pthread… yes
Checking for C library dl… yes
Checking for C library util… yes
Checking for C library m… yes
Checking for C library python2.7… yes
Checking for accept(0,0,0) in C++ library None… yes
Checking for zlibVersion() in C++ library z… yes
Checking for GOOGLE_PROTOBUF_VERIFY_VERSION in C++ library protobuf… yes
Checking for clock_nanosleep(0,0,NULL,NULL) in C library None… yes
Checking for timer_create(CLOCK_MONOTONIC, NULL, NULL) in C library None… no
Checking for timer_create(CLOCK_MONOTONIC, NULL, NULL) in C library rt… yes
Checking for C library tcmalloc… yes
Checking for backtrace_symbols_fd((void*)0, 0, 0) in C library None… yes
Checking for C header file fenv.h… yes
Checking for C header file linux/kvm.h… yes
Checking size of struct kvm_xsave … yes
Checking for member exclude_host in struct perf_event_attr…yes
Building in /local.chinook/gem5/gem5-tutorial/gem5/build/X86
Variables file /local.chinook/gem5/gem5-tutorial/gem5/build/variables/X86 not found,
using defaults in /local.chinook/gem5/gem5-tutorial/gem5/build_opts/X86
scons: done reading SConscript files.
scons: Building targets …
[ISA DESC] X86/arch/x86/isa/main.isa -> generated/inc.d
[NEW DEPS] X86/arch/x86/generated/inc.d -> x86-deps
[ENVIRONS] x86-deps -> x86-environs
[ CXX] X86/sim/main.cc -> .o
….
….
….
[ SHCXX] nomali/lib/mali_midgard.cc -> .os
[ SHCXX] nomali/lib/mali_t6xx.cc -> .os
[ SHCXX] nomali/lib/mali_t7xx.cc -> .os
[ AR] -> drampower/libdrampower.a
[ SHCXX] nomali/lib/addrspace.cc -> .os
[ SHCXX] nomali/lib/mmu.cc -> .os
[ RANLIB] -> drampower/libdrampower.a
[ SHCXX] nomali/lib/nomali_api.cc -> .os
[ AR] -> nomali/libnomali.a
[ RANLIB] -> nomali/libnomali.a
[ CXX] X86/base/date.cc -> .o
[ LINK] -> X86/gem5.opt
scons: done building targets.
编译完成后,您应该在build/X86/gem5.opt中有一个可运行的gem5可执行文件。编译可能会花费很长的时间,通常是15分钟或更长时间,尤其是在使用AFS或NFS之类的远程文件系统进行编译时。
gem5二进制类型
gem5中的SCons脚本当前具有5种可以为gem5构建的二进制文件:debug,opt,fast,prof和perf。 这些名称大多是不言自明的,但在下面进行了详细说明。
- debug
无需优化和调试符号即可构建。如果使用gem5的opt版本优化了要查看的变量,则使用调试器进行调试时,此二进制文件很有用。 与其他二进制文件相比,使用debug进行运行速度较慢。 - opt
该二进制文件是使用(例如-O3)的大多数优化构建的,但其中包含调试符号。该二进制文件比debug速度快得多,但是仍然包含足够的调试信息以能够调试大多数问题。 - fast
内置所有优化(包括受支持平台上的链接时优化),并且没有调试符号。 此外,所有断言都被删除,但仍然包括恐慌和致命事件。fast是性能最高的二进制文件,比opt小得多。但是,只有在您认为代码不太可能出现重大错误时,才需要使用fast。 - prof和perf
这两个二进制文件是为分析gem5而构建的。prof包含有关GNU Profiler(gprof)的分析信息,而perf包含有关Google性能工具(gperftools)的分析信息。
常见错误
略!!!
创建一个简单的配置脚本
本教程的这一章将引导您逐步了解如何为gem5设置简单的仿真脚本以及如何首次运行gem5。 假设您已完成本教程的第一章,并且已成功使用可执行文件build/X86/gem5.opt构建了gem5。
我们的配置脚本将为一个非常简单的系统建模。我们只有一个简单的CPU内核。 该CPU内核将连接到系统范围的内存总线。而且,我们将有一个DDR3内存通道,该通道也已连接到内存总线。
gem5配置脚本
gem5二进制文件以设置和执行模拟的python脚本作为参数。在此脚本中,您将创建一个系统来模拟,创建系统的所有组件并指定系统组件的所有参数。然后,从脚本开始仿真。
该脚本是完全由用户定义的。您可以选择在配置脚本中使用任何有效的Python代码。本书提供了一个样式示例,该样式在Python中高度依赖类和继承。作为gem5用户,由您决定配置脚本的简单或复杂。
gem5在configs/examples中附带了许多示例配置脚本。 这些脚本大多数都是无所不包的,并允许用户在命令行上指定几乎所有选项。 在本书中,我们将从最简单的脚本开始,这些脚本可以运行gem5并从那里构建,而不是从这些复杂的脚本开始。 希望到本节结束时,您将对模拟脚本的工作原理有所了解。
创建一个配置文件
首先创建一个新的配置文件并打开它:
mkdir configs/tutorial
touch configs/tutorial/simple.py
这只是一个普通的python文件,将由gem5可执行文件中的嵌入式python执行。因此,您可以使用python中可用的任何功能和库。
我们在此文件中要做的第一件事是导入m5库和我们已编译的所有SimObject。
import m5
from m5.objects import *
接下来,我们将创建第一个SimObject:我们将要模拟的系统。System对象将是我们模拟系统中所有其他对象的父对象。系统对象包含许多功能(非时序级别)信息,例如物理内存范围,根时钟域,根电压域,内核(在全系统仿真中)等。要创建系统SimObject,我们只是像普通的python类一样实例化它:
system = System()
现在我们已经有了要模拟的系统的参考,现在让我们在系统上设置时钟。我们首先必须创建一个时钟域。然后,我们可以在该域上设置时钟频率。 在SimObject上设置参数与在python中设置对象的成员完全相同,因此我们可以简单地将时钟设置为1 GHz。最后,我们必须为此时钟域指定一个电压域。由于我们现在不在乎系统电源,因此我们仅将默认选项用于电压域。
system.clk_domain = SrcClockDomain()
system.clk_domain.clock = ‘1GHz’
system.clk_domain.voltage_domain = VoltageDomain()
建立系统后,我们来设置如何模拟内存。我们将使用timing模式进行内存模拟。除非在特殊情况下(例如快速转发和从检查点还原),否则几乎将始终使用timing模式进行内存模拟。我们还将设置一个大小为512 MB的单个内存,这是一个非常小的系统。请注意,在python配置脚本中,每当需要size时,您都可以以常见的语言和单位(例如“ 512MB”)指定该大小。同样,您可以使用时间单位(例如“ 5ns”)。这些将分别自动转换为通用表示。
system.mem_mode = ‘timing’
system.mem_ranges = [AddrRange(‘512MB’)]
现在,我们可以创建一个CPU。 我们将从gem5中最简单的基于timing的CPU开始,即TimingSimpleCPU。该CPU模型每条指令在单个时钟周期内执行,以执行通过内存系统的内存请求(内存请求除外)。要创建CPU,您只需实例化该对象即可:
system.cpu = TimingSimpleCPU()
接下来,我们将创建系统范围的内存总线:
system.membus = SystemXBar()
现在我们有了一条内存总线,让我们将CPU上的缓存端口连接到它。在这种情况下,由于我们要模拟的系统没有任何缓存,因此我们将指令缓存和数据缓存端口直接连接到内存总线。在此示例系统中,我们没有缓存。
system.cpu.icache_port = system.membus.slave
system.cpu.dcache_port = system.membus.slave
接下来,我们需要连接其他几个端口,以确保我们的系统正常运行。 我们需要在CPU上创建一个I/O控制器,并将其连接到内存总线。 另外,我们需要将系统中的特殊端口连接到内存总线。 此端口是仅功能端口,用于允许系统读取和写入内存。
将PIO和中断端口连接到内存总线是x86特定的要求。 其他ISA(例如ARM)不需要这3条额外的线。
system.cpu.createInterruptController()
system.cpu.interrupts[0].pio = system.membus.master
system.cpu.interrupts[0].int_master = system.membus.slave
system.cpu.interrupts[0].int_slave = system.membus.mastersystem.system_port = system.membus.slave
接下来,我们需要创建一个内存控制器并将其连接到membus。对于此系统,我们将使用一个简单的DDR3控制器,它将负责我们系统的整个内存范围。
system.mem_ctrl = DDR3_1600_8x8()
system.mem_ctrl.range = system.mem_ranges[0]
system.mem_ctrl.port = system.membus.master
在完成这些最终连接之后,我们就完成了对模拟系统的实例化! 我们的系统应该看起来像没有缓存的简单系统配置。
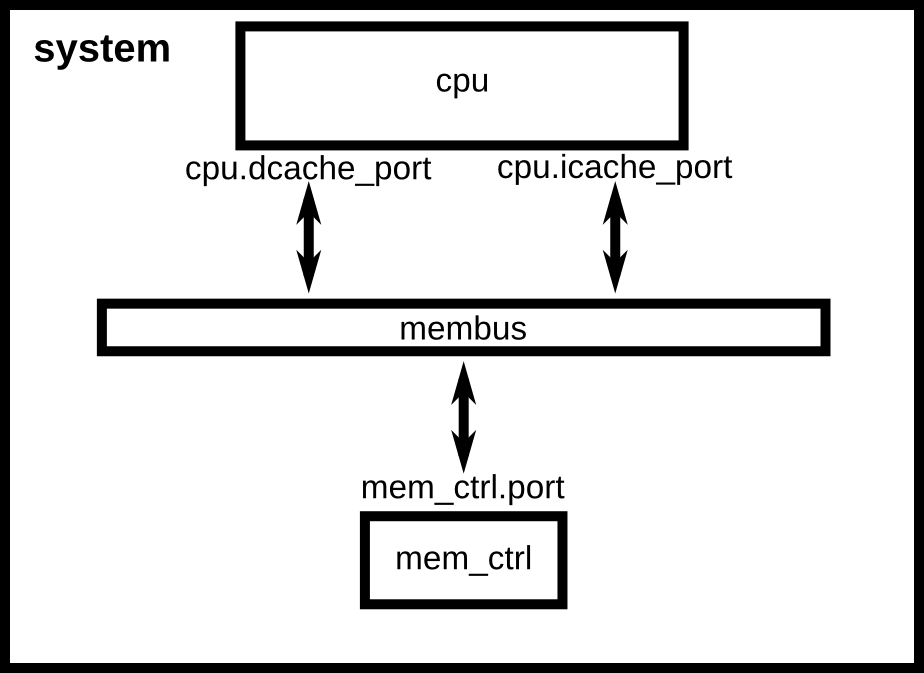
没有缓存的简单系统配置
接下来,我们需要设置希望CPU执行的进程。由于我们以系统调用仿真模式(System Emulation Mode, SE模式)执行,因此我们将CPU指向已编译的可执行文件。我们将执行一个简单的“ Hello world”程序。gem5附带了已编译的版本,因此我们将使用它。您可以指定任何为x86构建的应用程序,这些应用程序都是静态编译的。
首先,我们必须创建process(另一个SimObject)。然后,将process命令设置为要运行的命令。这是一个类似于argv的列表,可执行文件位于第一位置,而可执行文件的参数位于列表的其余部分。 然后,我们将CPU设置为使用进程作为其工作量,并最终在CPU中创建功能执行上下文。
process = Process()
process.cmd = [‘tests/test-progs/hello/bin/x86/linux/hello’]
system.cpu.workload = process
system.cpu.createThreads()
我们需要做的最后一件事是实例化系统并开始执行。 首先,我们创建Root对象。 然后我们实例化仿真。 实例化过程遍历了我们在python中创建的所有SimObject,并创建了C ++等效项。
注意,您不必实例化python类,然后将参数明确指定为成员变量。 您还可以将参数作为命名参数传递,例如下面的Root对象。
root = Root(full_system = False, system = system)
m5.instantiate()
最后,我们可以开始实际的模拟了! 顺便说一句,gem5现在正在使用Python 3样式的打印函数,因此print不再是语句,而必须作为函数调用。
print(“Beginning simulation!”)
exit_event = m5.simulate()
模拟完成后,我们就可以检查系统状态。
print(‘Exiting @ tick {} because {}’
.format(m5.curTick(), exit_event.getCause()))
运行gem5
现在,我们已经创建了一个简单的模拟脚本(完整版本可以在gem5/configs/learning_gem5/part1/simple.py中找到),我们可以运行gem5。gem5可以采用许多参数,但只需要一个位置参数即模拟脚本。因此,我们可以简单地从根gem5目录运行gem5:
build/X86/gem5.opt configs/tutorial/simple.py
输出应为:
gem5 Simulator System. http://gem5.org
gem5 is copyrighted software; use the –copyright option for details.gem5 compiled Mar 16 2018 10:24:24
gem5 started Mar 16 2018 15:53:27
gem5 executing on amarillo, pid 41697
command line: build/X86/gem5.opt configs/tutorial/simple.pyGlobal frequency set at 1000000000000 ticks per second
warn: DRAM device capacity (8192 Mbytes) does not match the address range assigned (512 Mbytes)
0: system.remote_gdb: listening for remote gdb on port 7000
Beginning simulation!
info: Entering event queue @ 0. Starting simulation…
Hello world!
Exiting @ tick 507841000 because exiting with last active thread context
可以更改配置文件中的参数,并且结果应该不同。例如,如果您将系统时钟加倍,则模拟应更快地完成。或者,如果将DDR控制器更改为DDR4,性能应该会更好。
此外,您可以将CPU模型更改为MinorCPU以对正序CPU进行建模,或者更改为DerivO3CPU对乱序CPU进行建模。但是,请注意,DerivO3CPU当前无法与simple.py一起使用,因为DerivO3CPU需要一个具有独立指令和数据缓存的系统(DerivO3CPU确实适用于下一部分中的配置)。
接下来,我们将缓存添加到我们的配置文件中,以对更复杂的系统进行建模。
SimObjects私语
gem5的模块化设计围绕SimObject类型构建。 仿真系统中的大多数组件都是SimObject:CPU,缓存,内存控制器,总线等。gem5将所有这些对象从C ++实现导出到python。 因此,从python配置脚本中,您可以创建任何SimObject,设置其参数并指定SimObject之间的交互。
有关更多信息,请参见http://www.gem5.org/SimObjects。
完整系统与系统调用仿真
gem5可以在两种不同的模式下运行,分别称为“系统调用仿真”和“完整系统”或SE和FS模式。在完整系统模式下(稍后在第V部分:完整系统仿真中介绍),gem5仿真整个硬件系统并运行未修改的内核。 完整系统模式类似于运行虚拟机。
另一方面,SE模式不会仿真系统中的所有设备,而是着重于仿真CPU和内存系统。SE更易于配置,因为您无需实例化实际系统中所需的所有硬件设备。 但是,SE只能仿真Linux系统调用,因此只能模拟用户模式代码。
如果您不需要为研究问题建模操作系统,并且想要提高性能,则应使用SE模式。但是,如果您需要对系统进行高保真建模,或者像页面表漫游这样的OS交互很重要,则应使用FS模式。
将缓存添加到配置脚本
以先前的配置脚本为起点,本章将逐步介绍更复杂的配置。如下图所示,我们将向系统添加一个缓存层次结构。此外,本章还将介绍对gem5统计信息的理解,以及向脚本中添加命令行参数的方法。
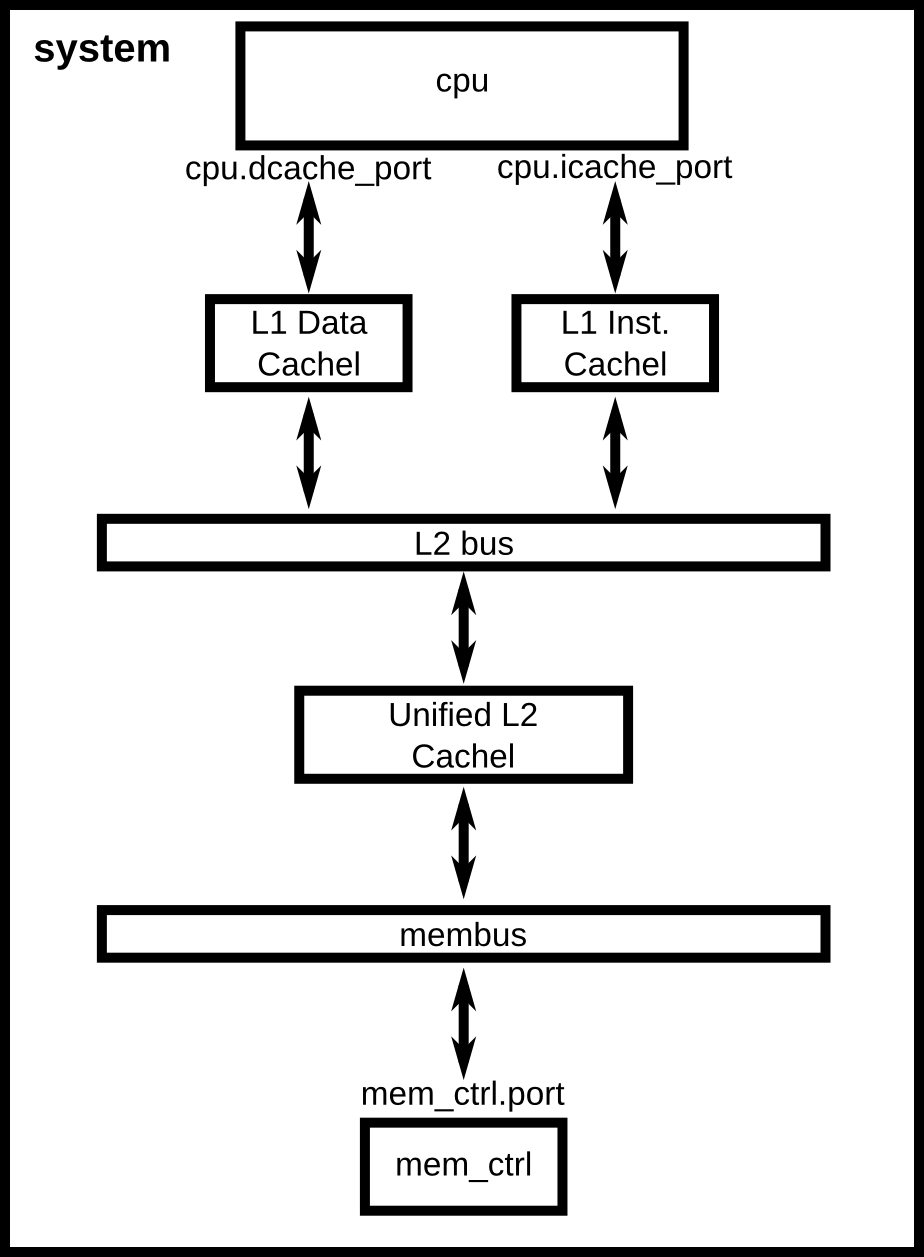
具有两级缓存层次结构的系统配置
创建缓存对象
我们将使用经典的缓存,而不是Ruby,因为我们正在为单个CPU系统建模,并且我们不在乎对缓存一致性进行建模。我们将扩展Cache SimObject并为我们的系统配置它。首先,我们必须了解用于配置Cache对象的参数。
Todo
我们应该添加指向SimObjects的链接(例如Cache),以指向gem5位置上的doxygen。
缓存
可以在src/mem/cache/Cache.py中找到Cache SimObject声明。该Python文件定义了您可以设置SimObject的参数。在后台,实例化SimObject时,会将这些参数传递给对象的C++实现。Cache SimObject继承自下面显示的BaseCache对象。
from m5.params import *
from m5.proxy import *
from MemObject import MemObject
from Prefetcher import BasePrefetcher
from ReplacementPolicies import *
from Tags import *class BaseCache(MemObject):
type = ‘BaseCache’
abstract = True
cxx_header = “mem/cache/base.hh”size = Param.MemorySize("Capacity") assoc = Param.Unsigned("Associativity") tag_latency = Param.Cycles("Tag lookup latency") data_latency = Param.Cycles("Data access latency") response_latency = Param.Cycles("Latency for the return path on a miss"); warmup_percentage = Param.Percent(0, "Percentage of tags to be touched to warm up the cache") max_miss_count = Param.Counter(0, "Number of misses to handle before calling exit") mshrs = Param.Unsigned("Number of MSHRs (max outstanding requests)") demand_mshr_reserve = Param.Unsigned(1, "MSHRs reserved for demand access") tgts_per_mshr = Param.Unsigned("Max number of accesses per MSHR") write_buffers = Param.Unsigned(8, "Number of write buffers") is_read_only = Param.Bool(False, "Is this cache read only (e.g. inst)") prefetcher = Param.BasePrefetcher(NULL,"Prefetcher attached to cache") prefetch_on_access = Param.Bool(False, "Notify the hardware prefetcher on every access (not just misses)") tags = Param.BaseTags(BaseSetAssoc(), "Tag store") replacement_policy = Param.BaseReplacementPolicy(LRURP(), "Replacement policy") sequential_access = Param.Bool(False, "Whether to access tags and data sequentially") cpu_side = SlavePort("Upstream port closer to the CPU and/or device") mem_side = MasterPort("Downstream port closer to memory") addr_ranges = VectorParam.AddrRange([AllMemory], "Address range for the CPU-side port (to allow striping)") system = Param.System(Parent.any, "System we belong to")# Enum for cache clusivity, currently mostly inclusive or mostly
# exclusive.
class Clusivity(Enum): vals = [‘mostly_incl’, ‘mostly_excl’]class Cache(BaseCache):
type = ‘Cache’
cxx_header = ‘mem/cache/cache.hh’# Control whether this cache should be mostly inclusive or mostly # exclusive with respect to upstream caches. The behaviour on a # fill is determined accordingly. For a mostly inclusive cache, # blocks are allocated on all fill operations. Thus, L1 caches # should be set as mostly inclusive even if they have no upstream # caches. In the case of a mostly exclusive cache, fills are not # allocating unless they came directly from a non-caching source, # e.g. a table walker. Additionally, on a hit from an upstream # cache a line is dropped for a mostly exclusive cache. clusivity = Param.Clusivity('mostly_incl', "Clusivity with upstream cache") # Determine if this cache sends out writebacks for clean lines, or # simply clean evicts. In cases where a downstream cache is mostly # exclusive with respect to this cache (acting as a victim cache), # the clean writebacks are essential for performance. In general # this should be set to True for anything but the last-level # cache. writeback_clean = Param.Bool(False, "Writeback clean lines")
在BaseCache类中,有许多参数。例如,assoc是一个整数参数。在这种情况下,某些参数(例如write_buffers)具有默认值8。除非第一个参数是字符串,否则默认参数是(Param.*)的第一个参数。每个参数的字符串参数是对该参数的描述(例如,tag_latency = Param.Cycles(“ Tag lookup latency”)表示`tag_latency控制“此缓存的命中延迟”)。
其中许多参数没有默认值,因此我们需要在调用m5.instantiate()之前设置这些参数。
现在,要创建具有特定参数的缓存,我们首先要在与simple.py相同的目录configs/tutorial中创建一个新文件caches.py。第一步是导入我们将在此文件中扩展的SimObject。
from m5.objects import Cache
接下来,我们可以像对待其他任何Python类一样对待BaseCache对象并对其进行扩展。 我们可以根据需要命名新的缓存。让我们首先创建一个L1缓存。
class L1Cache(Cache):
assoc = 2
tag_latency = 2
data_latency = 2
response_latency = 2
mshrs = 4
tgts_per_mshr = 20
在这里,我们正在设置BaseCache的一些没有默认值的参数。要查看所有可能的配置选项,并找出哪些是必需的,哪些是可选的,您必须查看SimObject的源代码。在这种情况下,我们正在使用BaseCache。
我们扩展了BaseCache,并在BaseCache SimObject中设置了大多数没有默认值的参数。接下来,让我们再讨论L1Cache的两个子类:L1DCache和L1ICache.
class L1ICache(L1Cache):
size = ‘16kB’class L1DCache(L1Cache):
size = ‘64kB’
我们还创建一个带有一些合理参数的L2缓存。
class L2Cache(Cache):
size = ‘256kB’
assoc = 8
tag_latency = 20
data_latency = 20
response_latency = 20
mshrs = 20
tgts_per_mshr = 12
既然我们已经指定了BaseCache所需的所有必要参数,那么我们要做的就是实例化子类并将缓存连接到互连。但是,将许多对象连接到复杂的互连可以使配置文件快速增长并变得不可读。因此,首先让我们向Cache的子类中添加一些辅助函数。请记住,这些只是Python类,因此我们可以对它们执行与Python类一样的任何操作。
在L1高速缓存中,我们添加两个功能:connectCPU将CPU连接到高速缓存,以及connectBus将高速缓存连接到总线。 我们需要将以下代码添加到L1Cache类中。
def connectCPU(self, cpu):
# need to define this in a base class!
raise NotImplementedErrordef connectBus(self, bus):
self.mem_side = bus.slave
接下来,我们必须为指令和数据缓存定义一个单独的connectCPU函数,因为指令缓存和数据缓存端口具有不同的名称。现在,我们的L1ICache和L1DCache类变为:
class L1ICache(L1Cache):
size = ‘16kB’def connectCPU(self, cpu): self.cpu_side = cpu.icache_portclass L1DCache(L1Cache):
size = ‘64kB’def connectCPU(self, cpu): self.cpu_side = cpu.dcache_port
最后,让我们向L2Cache添加函数以分别连接到内存侧和CPU侧总线。
def connectCPUSideBus(self, bus):
self.cpu_side = bus.masterdef connectMemSideBus(self, bus):
self.mem_side = bus.slave
完整文件可在gem5源代码中找到,位于gem5/configs/learning_gem5/part1/caches.py。
添加缓存简单的配置文件
现在,让我们将刚刚创建的缓存添加到上一章中创建的配置脚本中。
首先,让我们将脚本复制到一个新名称。
cp simple.py two_level.py
首先,我们需要将名称从caches.py文件导入名称空间。我们可以将以下内容添加到文件顶部(在m5.objects导入之后),就像使用任何Python源代码一样。
from caches import *
现在,在创建CPU之后,让我们创建L1缓存:
system.cpu.icache = L1ICache()
system.cpu.dcache = L1DCache()
并使用我们创建的helper函数将缓存连接到CPU端口。
system.cpu.icache.connectCPU(system.cpu)
system.cpu.dcache.connectCPU(system.cpu)
我们无法将L1缓存直接连接到L2缓存,因为L2缓存只希望有一个端口连接到它。 因此,我们需要创建一个L2总线以将我们的L1缓存连接到L2缓存。然后,我们可以使用我们的helper函数将L1缓存连接到L2总线。
system.l2bus = L2XBar()
system.cpu.icache.connectBus(system.l2bus)
system.cpu.dcache.connectBus(system.l2bus)
接下来,我们可以创建L2缓存并将其连接到L2总线和内存总线。
system.l2cache = L2Cache()
system.l2cache.connectCPUSideBus(system.l2bus)system.l2cache.connectMemSideBus(system.membus)
文件中的所有其他内容保持不变!现在,我们有了具有两级缓存层次结构的完整配置。如果您运行当前文件,则您现在应该在58513000个时钟完成操作。完整的脚本可以在gem5源代码中找到,位于gem5/configs/learning_gem5/part1/two_level.py。
向脚本添加参数
使用gem5进行实验时,您不想每次想用不同的参数测试系统时都编辑配置脚本。为了解决这个问题,您可以将命令行参数添加到gem5配置脚本中。同样,由于配置脚本只是Python,因此您可以使用支持参数解析的Python库。尽管optparse已被正式弃用,但gem5随附的许多配置脚本都使用了它,而不是py:mod:argparse,因为gem5的最低Python版本曾经是2.5。Python的最低版本现在是2.7,因此在编写不需要与当前gem5脚本进行交互的新脚本时,py:mod:argparse是一个更好的选择。要开始使用optparse,您可以查阅在线Python文档。
要在二级缓存配置中添加选项,请在导入缓存后添加一些选项。
from optparse import OptionParser
parser = OptionParser()
parser.add_option(‘–l1i_size’, help=”L1 instruction cache size”)
parser.add_option(‘–l1d_size’, help=”L1 data cache size”)
parser.add_option(‘–l2_size’, help=”Unified L2 cache size”)(options, args) = parser.parse_args()
现在,您可以运行build/X86/gem5.opt configs/tutorial/two_level_opts.py –help,它将显示您刚刚添加的选项。
接下来,我们需要将这些选项传递到我们在配置脚本中创建的缓存上。为此,我们只需更改two_level.py即可将选项作为参数传递给缓存,作为其构造函数的参数,然后添加一个适当的构造函数。
system.cpu.icache = L1ICache(options)
system.cpu.dcache = L1DCache(options)
…
system.l2cache = L2Cache(options)
在caches.py中,我们需要向每个类添加构造函数(Python中的__init__函数)。从基本L1缓存开始,我们将添加一个空的构造函数,因为我们没有适用于基本L1缓存的任何参数。但是,在这种情况下,我们不能忘记调用超类的构造函数。如果跳过对超类构造函数的调用,则在尝试实例化缓存对象时,gem5的SimObject属性查找功能将失败,并且结果将为“ RuntimeError:超出最大递归深度”。因此,在L1Cache中,我们需要在静态类成员之后添加以下内容。
def init(self, options=None):
super(L1Cache, self).init()
pass
接下来,在L1ICache中,我们需要使用我们创建的选项(l1i_size)来设置大小。 在下面的代码中,对于没有将选项传递给L1ICache构造函数以及是否在命令行上未指定选项的情况,有一些防护措施。 在这种情况下,我们将使用已经为尺寸指定的默认值。
def init(self, options=None):
super(L1ICache, self).init(options)
if not options or not options.l1i_size:
return
self.size = options.l1i_size
我们可以对L1DCache使用相同的代码:
def init(self, options=None):
super(L1DCache, self).init(options)
if not options or not options.l1d_size:
return
self.size = options.l1d_size
以及统一的L2Cache:
def init(self, options=None):
super(L2Cache, self).init()
if not options or not options.l2_size:
return
self.size = options.l2_size
通过这些更改,您现在可以从命令行(如下所示)将缓存大小传递到脚本中。
build/X86/gem5.opt configs/tutorial/two_level_opts.py –l2_size=’1MB’ –l1d_size=’128kB’
运行结果为:
gem5 Simulator System. http://gem5.org
gem5 is copyrighted software; use the –copyright option for details.gem5 compiled Sep 6 2015 14:17:02
gem5 started Sep 6 2015 15:06:51
gem5 executing on galapagos-09.cs.wisc.edu
command line: build/X86/gem5.opt ../tutorial/_static/scripts/part1/two_level_opts.py –l2_size=1MB –l1d_size=128kBGlobal frequency set at 1000000000000 ticks per second
warn: DRAM device capacity (8192 Mbytes) does not match the address range assigned (512 Mbytes)
0: system.remote_gdb.listener: listening for remote gdb #0 on port 7000
Beginning simulation!
info: Entering event queue @ 0. Starting simulation…
Hello world!
Exiting @ tick 56742000 because target called exit()
完整的脚本可以在gem5源代码中找到,位于gem5/configs/learning_gem5/part1/caches.py和gem5/configs/learning_gem5/part1/two_level.py。
了解gem5统计信息和输出
在运行gem5之后,除了可以打印出模拟脚本的所有信息外,在名为m5out的目录中还生成了三个文件:
- config.ini
包含为仿真创建的每个SimObject及其参数值的列表。 - config.json
与config.ini相同,但格式为json。 - stats.txt
为模拟注册的所有gem5统计信息的文本表示形式。
这些文件的创建位置可以通过以下方式控制:
–outdir=DIR, -d DIR
要创建的目录,其中包含gem5输出文件,包括config.ini,config.json,stats.txt以及其他文件。如果该目录中的文件已经存在,则将其覆盖。
config.ini
该文件是模拟内容的确定版本。 此文件中显示了模拟的每个SimObject的所有参数,无论是在配置脚本中设置还是使用默认值。
下面是运行“创建简单配置脚本”中的simple.py配置文件时生成的config.ini。[root]
type=Root
children=system
eventq_index=0
full_system=false
sim_quantum=0
time_sync_enable=false
time_sync_period=100000000000
time_sync_spin_threshold=100000000[system]
type=System
children=clk_domain cpu dvfs_handler mem_ctrl membus
boot_osflags=a
cache_line_size=64
clk_domain=system.clk_domain
default_p_state=UNDEFINED
eventq_index=0
exit_on_work_items=false
init_param=0
kernel=
kernel_addr_check=true
kernel_extras=
kvm_vm=Null
load_addr_mask=18446744073709551615
load_offset=0
mem_mode=timing…
[system.membus]
type=CoherentXBar
children=snoop_filter
clk_domain=system.clk_domain
default_p_state=UNDEFINED
eventq_index=0
forward_latency=4
frontend_latency=3
p_state_clk_gate_bins=20
p_state_clk_gate_max=1000000000000
p_state_clk_gate_min=1000
point_of_coherency=true
point_of_unification=true
power_model=
response_latency=2
snoop_filter=system.membus.snoop_filter
snoop_response_latency=4
system=system
use_default_range=false
width=16
master=system.cpu.interrupts.pio system.cpu.interrupts.int_slave system.mem_ctrl.port
slave=system.cpu.icache_port system.cpu.dcache_port system.cpu.interrupts.int_master system.system_port[system.membus.snoop_filter]
type=SnoopFilter
eventq_index=0
lookup_latency=1
max_capacity=8388608
system=system在这里,我们看到,在每个SimObject的描述开始时,首先是它在配置文件中创建的名称被方括号(例如[system.membus])包围。
接下来,将显示SimObject的每个参数及其值,包括未在配置文件中明确设置的参数。例如,配置文件将时钟域设置为1 GHz(在这种情况下为1000 ticks)。但是,它没有设置高速缓存行大小(系统中为64)对象。
config.ini文件是确保您模拟自己想模拟的东西的有用工具。gem5中有许多设置默认值和覆盖默认值的可能方法。始终检查config.ini是一项明智的选择,这是对配置文件中设置的值是否传播到实际SimObject实例的健全性检查。
stats.txt
gem5具有灵活的统计信息生成系统。gem5 Wiki网站上详细介绍了gem5统计信息。SimObject的每个实例都有自己的统计信息。在模拟结束时,或发出特殊的统计信息转储命令时,所有SimObjects的统计信息的当前状态都转储到文件中。
首先,统计文件包含有关执行的常规统计信息:
———- Begin Simulation Statistics ———-
sim_seconds 0.000346 # Number of seconds simulated
sim_ticks 345518000 # Number of ticks simulated
final_tick 345518000 # Number of ticks from beginning of simulation (restored from checkpoints and never reset)
sim_freq 1000000000000 # Frequency of simulated ticks
host_inst_rate 144400 # Simulator instruction rate (inst/s)
host_op_rate 260550 # Simulator op (including micro ops) rate (op/s)
host_tick_rate 8718625183 # Simulator tick rate (ticks/s)
host_mem_usage 778640 # Number of bytes of host memory used
host_seconds 0.04 # Real time elapsed on the host
sim_insts 5712 # Number of instructions simulated
sim_ops 10314 # Number of ops (including micro ops) simulated统计转储以———-Begin Simulation Statistics———-开始。如果在gem5执行期间存在多个统计转储,则单个文件中可能有多个。 这对于长时间运行的应用程序或从检查点还原时很常见。
每个统计信息都有一个名称(第一列),一个值(第二列)和描述(最后一列以#开头)。
大多数统计信息从其描述中都是可以自我解释的。几个重要的统计信息包括sim_seconds(这是模拟的总模拟时间),sim_insts(这是CPU提交的指令数量)和host_inst_rate(告诉您gem5的性能)。
接下来,将打印SimObjects的统计信息。 例如,内存控制器统计信息。 它具有诸如每个组件读取的字节以及这些组件使用的平均带宽之类的信息。
system.clk_domain.voltage_domain.voltage 1 # Voltage in Volts
system.clk_domain.clock 1000 # Clock period in ticks
system.mem_ctrl.pwrStateResidencyTicks::UNDEFINED 507841000 # Cumulative time (in ticks) in various power states
system.mem_ctrl.bytes_read::cpu.inst 58264 # Number of bytes read from this memory
system.mem_ctrl.bytes_read::cpu.data 7167 # Number of bytes read from this memory
system.mem_ctrl.bytes_read::total 65431 # Number of bytes read from this memory
system.mem_ctrl.bytes_inst_read::cpu.inst 58264 # Number of instructions bytes read from this memory
system.mem_ctrl.bytes_inst_read::total 58264 # Number of instructions bytes read from this memory
system.mem_ctrl.bytes_written::cpu.data 7160 # Number of bytes written to this memory
system.mem_ctrl.bytes_written::total 7160 # Number of bytes written to this memory
system.mem_ctrl.num_reads::cpu.inst 7283 # Number of read requests responded to by this memory
system.mem_ctrl.num_reads::cpu.data 1084 # Number of read requests responded to by this memory
system.mem_ctrl.num_reads::total 8367 # Number of read requests responded to by this memory
system.mem_ctrl.num_writes::cpu.data 941 # Number of write requests responded to by this memory
system.mem_ctrl.num_writes::total 941 # Number of write requests responded to by this memory
system.mem_ctrl.bw_read::cpu.inst 114728823 # Total read bandwidth from this memory (bytes/s)
system.mem_ctrl.bw_read::cpu.data 14112685 # Total read bandwidth from this memory (bytes/s)
system.mem_ctrl.bw_read::total 128841507 # Total read bandwidth from this memory (bytes/s)
system.mem_ctrl.bw_inst_read::cpu.inst 114728823 # Instruction read bandwidth from this memory (bytes/s)
system.mem_ctrl.bw_inst_read::total 114728823 # Instruction read bandwidth from this memory (bytes/s)
system.mem_ctrl.bw_write::cpu.data 14098901 # Write bandwidth from this memory (bytes/s)
system.mem_ctrl.bw_write::total 14098901 # Write bandwidth from this memory (bytes/s)
system.mem_ctrl.bw_total::cpu.inst 114728823 # Total bandwidth to/from this memory (bytes/s)
system.mem_ctrl.bw_total::cpu.data 28211586 # Total bandwidth to/from this memory (bytes/s)
system.mem_ctrl.bw_total::total 142940409 # Total bandwidth to/from this memory (bytes/s)该文件的后面是CPU统计信息,其中包含有关syscall数量,分支数量,已提交的指令总数等信息。
system.cpu.dtb.walker.pwrStateResidencyTicks::UNDEFINED 507841000 # Cumulative time (in ticks) in various power states
system.cpu.dtb.rdAccesses 1084 # TLB accesses on read requests
system.cpu.dtb.wrAccesses 941 # TLB accesses on write requests
system.cpu.dtb.rdMisses 9 # TLB misses on read requests
system.cpu.dtb.wrMisses 7 # TLB misses on write requests
system.cpu.apic_clk_domain.clock 16000 # Clock period in ticks
system.cpu.interrupts.pwrStateResidencyTicks::UNDEFINED 507841000 # Cumulative time (in ticks) in various power states
system.cpu.itb.walker.pwrStateResidencyTicks::UNDEFINED 507841000 # Cumulative time (in ticks) in various power states
system.cpu.itb.rdAccesses 0 # TLB accesses on read requests
system.cpu.itb.wrAccesses 7284 # TLB accesses on write requests
system.cpu.itb.rdMisses 0 # TLB misses on read requests
system.cpu.itb.wrMisses 31 # TLB misses on write requests
system.cpu.workload.numSyscalls 11 # Number of system calls
system.cpu.pwrStateResidencyTicks::ON 507841000 # Cumulative time (in ticks) in various power states
system.cpu.numCycles 507841 # number of cpu cycles simulated
system.cpu.numWorkItemsStarted 0 # number of work items this cpu started
system.cpu.numWorkItemsCompleted 0 # number of work items this cpu completed
system.cpu.committedInsts 5712 # Number of instructions committed
system.cpu.committedOps 10313 # Number of ops (including micro ops) committed
system.cpu.num_int_alu_accesses 10204 # Number of integer alu accesses
system.cpu.num_fp_alu_accesses 0 # Number of float alu accesses
system.cpu.num_vec_alu_accesses 0 # Number of vector alu accesses
system.cpu.num_func_calls 221 # number of times a function call or return occured
system.cpu.num_conditional_control_insts 986 # number of instructions that are conditional controls
system.cpu.num_int_insts 10204 # number of integer instructions
system.cpu.num_fp_insts 0 # number of float instructions
system.cpu.num_vec_insts 0 # number of vector instructions
system.cpu.num_int_register_reads 19293 # number of times the integer registers were read
system.cpu.num_int_register_writes 7976 # number of times the integer registers were written
system.cpu.num_fp_register_reads 0 # number of times the floating registers were read
system.cpu.num_fp_register_writes 0 # number of times the floating registers were written
system.cpu.num_vec_register_reads 0 # number of times the vector registers were read
system.cpu.num_vec_register_writes 0 # number of times the vector registers were written
system.cpu.num_cc_register_reads 7020 # number of times the CC registers were read
system.cpu.num_cc_register_writes 3825 # number of times the CC registers were written
system.cpu.num_mem_refs 2025 # number of memory refs
system.cpu.num_load_insts 1084 # Number of load instructions
system.cpu.num_store_insts 941 # Number of store instructions
system.cpu.num_idle_cycles 0 # Number of idle cycles
system.cpu.num_busy_cycles 507841 # Number of busy cycles
system.cpu.not_idle_fraction 1 # Percentage of non-idle cycles
system.cpu.idle_fraction 0 # Percentage of idle cycles
system.cpu.Branches 1306 # Number of branches fetched
使用默认配置脚本
在本章中,我们将探索使用gem5随附的默认配置脚本。gem5附带了许多配置脚本,可让您非常快速地使用gem5。但是,常见的陷阱是使用这些脚本而没有完全了解要模拟的内容。在使用gem5进行计算机体系结构研究时,充分了解要模拟的系统非常重要。本章将引导您完成一些重要的选项以及默认配置脚本的各个部分。
在最后几章中,您是从头开始创建自己的配置脚本的。这非常强大,因为它允许您指定每个单个系统参数。但是,某些系统的设置非常复杂(例如,全系统ARM或x86计算机)。幸运的是,gem5开发人员提供了许多脚本来引导构建系统的过程。
目录结构浏览
gem5的所有配置文件都可以在configs/中找到。 目录结构如下所示:
configs/boot:
ammp.rcS halt.sh micro_tlblat2.rcS netperf-stream-udp-local.rcS
…configs/common:
Benchmarks.py cpu2000.py Options.py
Caches.py FSConfig.py O3_ARM_v7a.py SysPaths.py
CacheConfig.py CpuConfig.py MemConfig.py Simulation.pyconfigs/dram:
sweep.pyconfigs/example:
fs.py read_config.py ruby_mem_test.py ruby_random_test.py
memtest.py ruby_direct_test.py ruby_network_test.py se.pyconfigs/ruby:
MESI_Three_Level.py MI_example.py MOESI_CMP_token.py Network_test.py
MESI_Two_Level.py MOESI_CMP_directory.py MOESI_hammer.py Ruby.pyconfigs/splash2:
cluster.py run.pyconfigs/topologies:
BaseTopology.py Cluster.py Crossbar.py MeshDirCorners.py Mesh.py Pt2Pt.py Torus.py
每个目录的简要说明如下:
- boot/
这些是在完整系统模式下使用的rcS文件。这些文件在Linux引导后由模拟器加载,并由Shell执行。在全系统模式下运行时,其中大多数用于控制基准。其中一些是实用程序功能,例如hack_back_ckpt.rcS。 这些文件将在全系统仿真一章中更深入地介绍。 - common/
该目录包含许多帮助程序脚本和创建模拟系统的功能。例如,Caches.py与前面各章中创建的caches.py和caches_opts.py文件相似。
Options.py包含可以在命令行上设置的各种选项。 像CPU的数量,系统时钟等等。 这是查看是否要更改的选项是否已包含命令行参数的好地方。
CacheConfig.py包含用于设置经典内存系统的缓存参数的选项和功能。
MemConfig.py提供了一些用于设置内存系统的帮助程序功能。
FSConfig.py包含必要的功能,可为许多不同类型的系统设置全系统仿真。全系统仿真将在本章中进一步讨论。
Simulation.py包含许多帮助函数,用于设置和运行gem5。此文件中包含的许多代码都用于管理保存和还原检查点。下列example/中的示例配置文件使用该文件中的功能来执行gem5仿真。该文件非常复杂,但是它在模拟的运行方式上也提供了很大的灵活性。 - dram/
包含用于测试DRAM的脚本。 - example/
该目录包含一些示例gem5配置脚本,可以直接使用它们来运行gem5。具体来说,se.py和fs.py非常有用。有关这些文件的更多信息,请参见下一部分。此目录中还有一些其他实用程序配置脚本。 - ruby/
此目录包含Ruby及其随附的缓存一致性协议的配置脚本。更多细节可以在Ruby一章中找到。 - splash2/
该目录包含用于运行splash2基准套件的脚本,其中包含一些用于配置模拟系统的选项。 - topologies/
该目录包含创建Ruby缓存层次结构时可以使用的拓扑的实现。更多细节可以在Ruby一章中找到。
使用se.py和fs.py
在本节中,我将讨论一些可以在命令行上传递给se.py和fs.py的常用选项。有关如何运行全系统模拟的更多详细信息,请参见“全系统模拟”一章。在这里,我将讨论两个文件共有的选项。
本节中讨论的大多数选项都可以在Options.py中找到,并已在addCommonOptions函数中注册。本节未详细介绍所有选项,要查看所有选项,请使用–help运行配置脚本,或阅读脚本的源代码。
首先,我们简单地运行不带任何参数的hello world程序:
build/X86/gem5.opt configs/example/se.py –cmd=tests/test-progs/hello/bin/x86/linux/hello
并获得以下输出:
gem5 Simulator System. http://gem5.org
gem5 is copyrighted software; use the –copyright option for details.gem5 compiled Jan 14 2015 16:11:34
gem5 started Feb 2 2015 15:22:24
gem5 executing on mustardseed.cs.wisc.edu
command line: build/X86/gem5.opt configs/example/se.py –cmd=tests/test-progs/hello/bin/x86/linux/hello
Global frequency set at 1000000000000 ticks per second
warn: DRAM device capacity (8192 Mbytes) does not match the address range assigned (512 Mbytes)
0: system.remote_gdb.listener: listening for remote gdb #0 on port 7000
** REAL SIMULATION **
info: Entering event queue @ 0. Starting simulation…
Hello world!
Exiting @ tick 5942000 because target called exit()
但是,这根本不是一个非常有趣的模拟!默认情况下,gem5使用原子CPU并使用原子内存访问,因此没有实际的时序数据报告!要确认这一点,您可以查看m5out/config.ini。CPU显示在第46行:
[system.cpu]
type=AtomicSimpleCPU
children=apic_clk_domain dtb interrupts isa itb tracer workload
branchPred=Null
checker=Null
clk_domain=system.cpu_clk_domain
cpu_id=0
do_checkpoint_insts=true
do_quiesce=true
do_statistics_insts=true
要在计时模式下实际运行gem5,请指定CPU类型。在此期间,我们还可以指定L1缓存的大小。
build/X86/gem5.opt configs/example/se.py –cmd=tests/test-progs/hello/bin/x86/linux/hello –cpu-type=TimingSimpleCPU –l1d_size=64kB –l1i_size=16kB
gem5 Simulator System. http://gem5.org
gem5 is copyrighted software; use the –copyright option for details.gem5 compiled Jan 14 2015 16:11:34
gem5 started Feb 2 2015 15:26:57
gem5 executing on mustardseed.cs.wisc.edu
command line: build/X86/gem5.opt configs/example/se.py –cmd=tests/test-progs/hello/bin/x86/linux/hello –cpu-type=TimingSimpleCPU –l1d_size=64kB –l1i_size=16kB
Global frequency set at 1000000000000 ticks per second
warn: DRAM device capacity (8192 Mbytes) does not match the address range assigned (512 Mbytes)
0: system.remote_gdb.listener: listening for remote gdb #0 on port 7000
** REAL SIMULATION **
info: Entering event queue @ 0. Starting simulation…
Hello world!
Exiting @ tick 344986500 because target called exit()
现在,让我们检查config.ini文件,并确保将这些选项正确传播到最终系统。 如果在m5out/config.ini中搜索“cache”,则会发现未创建任何缓存! 即使我们指定了缓存的大小,也没有指定系统应使用缓存,因此未创建缓存。 正确的命令行应为:
build/X86/gem5.opt configs/example/se.py –cmd=tests/test-progs/hello/bin/x86/linux/hello –cpu-type=TimingSimpleCPU –l1d_size=64kB –l1i_size=16kB –caches
gem5 Simulator System. http://gem5.org
gem5 is copyrighted software; use the –copyright option for details.gem5 compiled Jan 14 2015 16:11:34
gem5 started Feb 2 2015 15:29:20
gem5 executing on mustardseed.cs.wisc.edu
command line: build/X86/gem5.opt configs/example/se.py –cmd=tests/test-progs/hello/bin/x86/linux/hello –cpu-type=TimingSimpleCPU –l1d_size=64kB –l1i_size=16kB –caches
Global frequency set at 1000000000000 ticks per second
warn: DRAM device capacity (8192 Mbytes) does not match the address range assigned (512 Mbytes)
0: system.remote_gdb.listener: listening for remote gdb #0 on port 7000
** REAL SIMULATION **
info: Entering event queue @ 0. Starting simulation…
Hello world!
Exiting @ tick 29480500 because target called exit()
在最后一行,我们看到总时间从344986500个周期变为29480500个周期,速度要快得多!看起来缓存现在可能已启用。但是,最好再次检查config.ini文件。
[system.cpu.dcache]
type=BaseCache
children=tags
addr_ranges=0:18446744073709551615
assoc=2
clk_domain=system.cpu_clk_domain
demand_mshr_reserve=1
eventq_index=0
forward_snoops=true
hit_latency=2
is_top_level=true
max_miss_count=0
mshrs=4
prefetch_on_access=false
prefetcher=Null
response_latency=2
sequential_access=false
size=65536
system=system
tags=system.cpu.dcache.tags
tgts_per_mshr=20
two_queue=false
write_buffers=8
cpu_side=system.cpu.dcache_port
mem_side=system.membus.slave[2]
se.py和fs.py一些常见的选项
运行如下指令时会打印所有可能的选项:
build/X86/gem5.opt configs/example/se.py –help
以下是该列表中的一些重要选项。
- –cpu-type=CPU_TYPE
要运行的cpu的类型。这是始终设置的重要参数。默认值为atomic,它不执行时序仿真。 - –sys-clock=SYS_CLOCK
以系统速度运行的块的顶层时钟。 - –cpu-clock=CPU_CLOCK
以CPU速度运行的块的时钟。这与上面的系统时钟是分开的。 - –mem-type=MEM_TYPE
要使用的内存类型。选项包括不同的DDR内存和ruby内存控制器。 - –caches
使用经典缓存执行仿真。 - –l2cache
如果使用经典缓存,请使用L2缓存执行仿真。 - –ruby
使用Ruby代替传统的高速缓存作为高速缓存系统模拟。 - -m TICKS, –abs-max-tick=TICKS
运行到指定的绝对模拟周期,包括来自已还原检查点的周期。如果您只想模拟一定数量的模拟时间,这将很有用。 - -I MAXINSTS, –maxinsts=MAXINSTS
要模拟的指令总数(默认值:永远运行)。如果要在执行一定数量的指令后停止仿真,此功能很有用。 - -c CMD, –cmd=CMD
在系统调用仿真模式下运行的二进制文件。 - -o OPTIONS, –options=OPTIONS
传递给二进制文件的选项,使用“”扩起整个字符串。当您运行带有选项的命令时,这很有用。您可以通过此变量传递参数和选项(例如–whatever)。 - –output=OUTPUT
将标准输出重定向到文件。如果您想将模拟应用程序的输出重定向到文件而不是打印到屏幕,这将很有用。注意:要重定向gem5输出,必须在配置脚本之前传递参数。 - –errout=ERROUT
将stderr重定向到文件。与上面类似。